LISTENING TO KATRINA - PREPAREDNESS
PROJECTS
THE CONTENTS OF THIS PAGE ARE RATED 'G' AND ARE
SUITABLE FOR ALL AUDIENCES

LIFE GOES ON BAG - FLASH DANCE
PRINT
THIS PAGE
Workbook
page: None
Listening to Katrina companion
page: HYST - Documents
 I
am going to show you how to use your USB Flash Drive to make portable
'rescue' copies of your data. Truly prepared people do not make
backups - but I will explain that on the next page. By making a rescue
copy of your vital records, important documents, and photographs onto a USB
Flash Drive, you cram an enormous amount of data wealth into a very small
space.
I
am going to show you how to use your USB Flash Drive to make portable
'rescue' copies of your data. Truly prepared people do not make
backups - but I will explain that on the next page. By making a rescue
copy of your vital records, important documents, and photographs onto a USB
Flash Drive, you cram an enormous amount of data wealth into a very small
space.
The benefits of this are obvious. You can carry your USB Flash Drive anywhere. You can run out of the house naked in the middle of the night with the USB Flash Drive tied around your neck like a piece of neo-tech jewelry and still have all of that data with you. If you happen to be rescued by EMS - be that by helicopter off your roof because your house is under 8 feet of water or taken to the hospital after a car accident - EMS is not going to take your LGO Bag. You are going to have to leave it behind. Your Flash Drive, however, is so small that they will not notice it around your neck, in your pocket, or otherwise stashed on or about your person. We are going to talk about some particulars of that scenario later, but arriving at the hospital with a complete set of your medical records might save your life - which is another reason to keep your USB Flash Drive handy at all times.
You can also use the devices as a portable briefcase for documents that you regularly work on. You can modify your documents from any computer, move files around, and synchronize the documents to your 'home' computer at a convenient time.
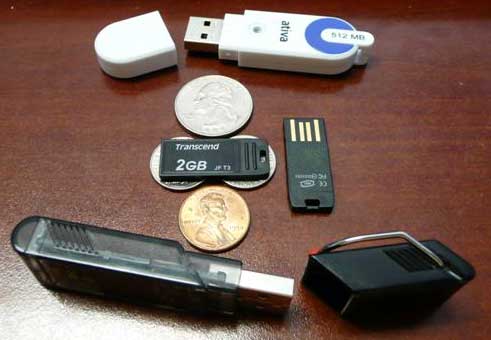
Before we get into how to accomplish this, you should understand some things about the devices themselves. There are many types, brands, capacities, and sizes on the market. They range in price from cheap-cheap to "Oh my goodness!" I use the Transcend JetFlash 2GB drives because they are tiny, waterproof, and get good reviews. They cost less than $10 each. Depending on your storage needs, you can get the 1GB version. They just came out with 4GB ones, but I don't have any of those yet. In the image above you can also see some of my older drives. The Ativa 512 has worked for over two years, and the black IBM drive is over 4 years old - but it's only 256 MB which is too small for me now.
If you go to www.newegg.com and type 'usb flash drive' into the search box, you will have hundreds of options. Which one is right for you? That depends on your needs. My wife does not like the Transcend drives because they are too small, and she is afraid to lose them. She uses one of 'normal' size, which is like the IBM drive pictured. If I had to recommend something generic, I would say to get whatever you want of at least 2 GB capacity. I would not spend the big bucks and buy the very large capacity drives as they are 'cool' toys and not really a good value - at least not yet. In another year or three, they will be cheap-cheap and everyone will have a few.
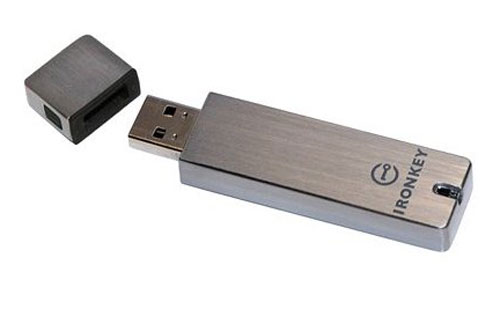 Some
people like IronKey
drives, which have built in encryption and are built like a tank. They
are also relatively expensive. If you like them and use them, then I'm
good with that. I'm just the cheapest man alive and I want a higher
value ratio for my money. I suppose I should also say again that what
I am documenting here is *a* way, not *the* way. If you have other
methods that work for you, then do that. This is what I do,
and what you do should suit your particular needs.
Some
people like IronKey
drives, which have built in encryption and are built like a tank. They
are also relatively expensive. If you like them and use them, then I'm
good with that. I'm just the cheapest man alive and I want a higher
value ratio for my money. I suppose I should also say again that what
I am documenting here is *a* way, not *the* way. If you have other
methods that work for you, then do that. This is what I do,
and what you do should suit your particular needs.
Now that you appreciate the benefits of USB Flash Drives, you should also appreciate the drawbacks. The physical devices themselves are quite durable. You can drop them, kick them, and let them roll around in the bottom of a purse or bag with no ill effect. There are no moving parts to break, and they aren't technically a 'drive' at all. They are just a few chips soldiered to a circuit board with a USB connector stuck on the end. They'll even survive a few passes through a washer and dryer.
The technology upon which the chips are built, however, has limitations. Flash memory chips are non-volatile, which means that no power is needed to maintain the information stored in the chip. The microscopic switches inside that chip can only be switched so many times before they start to wear out and break down. As a chip gets older, it gets slower as the error checking features work around the breakdowns. Depending on the initial quality of the chip, it will have between 10,000 and 10 million write-erase cycles before it dies. That may seem like a lot, but it means that your USB Flash Drive has a limited lifespan. How long will that be? It depends on the initial quality of the chip itself (which varies widely, even among identical units) and how much you use it. I only use mine as a 'rescue copy' device, and I haven't had one fail on me yet. I have several that are a few years old and they work with no trouble. People who use their USB Flash Drives as briefcases for documents that they frequently work on usually get two or three years of life out of them before they die. What you need to keep in mind is that your USB Flash Drive will not last forever, and one day it will fail. You should replace the USB Flash Drives that you depend on for 'rescue copy' service every three years even if they show no signs of trouble. The last thing you want is to be rescued off a rooftop, lose everything but your USB Flash Drive only to find out that the thing is stone dead.
Kept in a cool, dry place, a USB Flash Drive will keep data integrity indefinitely. Riding around in your wallet, in your purse, or around your neck, it will be exposed to all kinds of environmental changes that will shorten its life. Few USB Flash Drives are truly waterproof. The Transcend drives that I use are, but even so I don't make it a habit to drop them in the toilet or run them through the dishwasher. If you have an accident and drop it in a puddle or run it through the washing machine, make sure it is completely dry before plugging it into a computer. It will still work just fine - but replace it anyway. The tiny circuits will start to corrode, and it will fail in a very short period of time once it has been wet.
The bottom line is to think about your USB Flash Drive as a consumable item. Do not fall in love with it; it does not love you. Like your favorite dog, it will die one day - and possibly at an inopportune moment. DO NOT TRUST THE MACHINES!
Having said all that, USB Flash Drives are the best solution for data portability using current technology. Technology changes quickly, and tomorrow there may be something better. Solid state drives have started to hit the market, and those show promise but are very expensive and not as small as USB drives at this time. In a few years everything on this page will be obsolete, and we'll be doing something else. For now, though Flash Drives are the way to go.
You may notice that your USB Flash Drives came without instructions. That's because they are so easy to use that you don't need any instructions. Well, that's what all the geeks assume. If you aren't a geek, though, what do you do? Well, keep reading.

Here is my old IBM drive. It's only 256 MB, but it will work for
demonstration purposes. You can see my laptop in the background, and
the USB port is visible at the far right. Every modern computer has at
least one, and usually three or more.
![]() They
are designated by the universal symbol that looks like this. You will
find that symbol next to the USB ports on your computer.
They
are designated by the universal symbol that looks like this. You will
find that symbol next to the USB ports on your computer.
The drive only fits one way, and it should go in with very little force. If it doesn't fit, rotate it 180 degrees and try again. When you first plug it in, the Windows operating system may flash several windows at you talking about how it is installing drivers and configuring the device. Eventually, though, it will tell you, "Your new hardware is ready to use." This is true for Windows XP and later. If you have Windows 98 or Windows 95 you may need to install a driver manually, but that is beyond the scope of this document. If you have a modern computer, you should be able to plug it in and it should work.
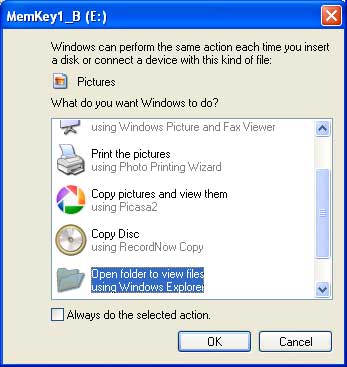
Depending on your operating system, you may see a window like this one which asks you what action you wish to perform. If you wish to use this wizard you can, but I find it cumbersome and I always just click CANCEL.
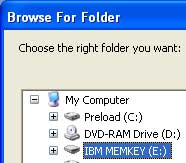
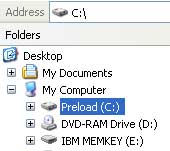 If
you open Windows Explorer, the device should show up as a drive letter in
your drive list. In this example, it shows up as drive (E:) and is
named IBM MEMKEY. Your USB Flash Drive may or may not have a name, but
you should assign one. To do this, right click on it and select
RENAME from the menu. I like to name my
Flash Drives using the same convention as the folder names under my MemKey
folder. I have them named MemKey1, MemKey2, and so on for each set of
data that I want to assign to a Flash Drive. That stands for Memory
Key, BTW. You can use a similar convention, or name them after
individual family members so that each member of the family can distinguish
their own data sets. Since we are talking about 'rescue' drives, I'm
going to stick with the MemKey naming convention. You may have other Flash
Drives that you use for other purposes.
If
you open Windows Explorer, the device should show up as a drive letter in
your drive list. In this example, it shows up as drive (E:) and is
named IBM MEMKEY. Your USB Flash Drive may or may not have a name, but
you should assign one. To do this, right click on it and select
RENAME from the menu. I like to name my
Flash Drives using the same convention as the folder names under my MemKey
folder. I have them named MemKey1, MemKey2, and so on for each set of
data that I want to assign to a Flash Drive. That stands for Memory
Key, BTW. You can use a similar convention, or name them after
individual family members so that each member of the family can distinguish
their own data sets. Since we are talking about 'rescue' drives, I'm
going to stick with the MemKey naming convention. You may have other Flash
Drives that you use for other purposes.
I also keep more than one USB Flash Drive for each rescue set, so I append A or B to the back of the name. In the example above, you can see that the Flash Drive I had inserted shows as MemKey1_B at the top of the window. That means it's the 'B' copy that I keep in my camera bag.
Now that we have the Flash Drive installed and named, it's time to copy our data onto the device. If you are computer savvy, you can do this directly through Windows Explorer. If, however, all this file copy stuff is Greek to you, follow along with me and I'll teach you how to use a brilliant little piece of software known as the SyncToy. This is another piece of free software that we can get directly from Microsoft Power Toys. Go ahead and click the link, find the SyncToy download, download it and install it.
Done? Good. Now click the START button in the lower left corner of your screen, and select ALL PROGRAMS, and find the SyncToy icon. Right click on it and select SEND TO and then DESKTOP (AS SHORTCUT). If you need help, click here for an image that shows you what I'm talking about.
 Got
it? Great! Now double click the SyncToy icon on your desktop (or
in the Start menu) and fire up the program. I am going to show you how
to use SyncToy to make it easy for you to maintain your rescue copies.
If you want to, you can read the help section of the program and learn about
all the other things it can do. For now, though, let's set up a rescue
set.
Got
it? Great! Now double click the SyncToy icon on your desktop (or
in the Start menu) and fire up the program. I am going to show you how
to use SyncToy to make it easy for you to maintain your rescue copies.
If you want to, you can read the help section of the program and learn about
all the other things it can do. For now, though, let's set up a rescue
set.
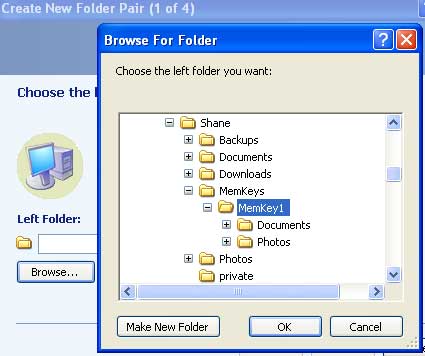
Click the CREATE NEW FOLDER PAIR button, then click the BROWSE button under Left Folder in the popup window. Now browse for your rescue folder - which in our example is under MY COMPUTER then drive (C:) then your data store folder - which in this example is my name.
Now drill down until you find your first rescue set - which is MemKey1 if you followed my model. Click on it, then click the OK button. The path now appears in the LEFT FOLDER text box. Click NEXT to continue.
 For
the Right Folder, we want the USB Flash Drive itself, which in our example
is under MY COMPUTER. Select the drive itself and click the OK button.
You will now see the flash drive in the RIGHT FOLDER text box.
For
the Right Folder, we want the USB Flash Drive itself, which in our example
is under MY COMPUTER. Select the drive itself and click the OK button.
You will now see the flash drive in the RIGHT FOLDER text box.
Click NEXT to continue.
You are now presented with several options on how files will synchronize. In our context we are only interested in Synchronize or Echo. If you are only using your USB Flash Drive as a rescue copy, then use Echo. If you do work away from your 'home' computer on the Flash Drive and make changes to those files that you want synchronized back to the 'home' computer, then select Synchronize. Since I do not change files on the drive, I use Echo. If you aren't sure, then use Synchronize. Click NEXT to continue.
Now it's time to name your folder pair. To keep things logical, I use the same naming convention as the folders. In this example, that's 'MemKey1 Sync'. Click FINISH to continue.
To copy your rescue set to your USB Flash Drive, click the RUN button. Go ahead and do it now and while it runs we can keep talking. When you click RUN, a new window pops up and shows a progress bar. When done, the little window shows you what the program did.
You can create new folder pairs for each of your USB Flash Drives, linking each one to the folder on your hard drive where you keep the source data. If your family members all use the same computer, they can make individual folder pairs for them. This make synchronizing data between your source folders and the USB Flash Drive very easy.
Be aware that if you use the same USB port for all your flash drives (like I do) then the drive letter for the Flash Drive will be the same for every folder pair you create. If you have the wrong USB Flash Drive plugged in when you run a particular Synchronization job, then you will end up with the wrong data on that drive. By exercising a little caution this is easily avoidable.
The other issue that you may encounter is that if you plug in another USB device that uses a drive letter, and then plug in your USB Flash Drive, then the drive letter for the USB Flash Drive will change. The operating system will assign the next available letter to the USB Flash Drive, and that will cause the SyncToy some confusion. To avoid this always plug the USB Flash Drive in first, and make sure the drive letter is correct in Windows Explorer.
When you want to update the data on your USB Flash Drive, just insert it into the computer, open the SyncToy, select the particular Sync Folder Pair in the left panel, and click RUN. It's really that easy.
When the SyncToy finishes and you are done with it, you can close it.
 The
last thing that you need to know is that you should never remove the USB
Flash Drive from the computer while data is being copied to it or from it.
In fact, you cannot just pull it out of the computer even if it isn't moving
files. You must follow one of two procedures to avoid corrupting your
data. The first and easiest method is to simply shut the computer
down. That will release the USB Flash Drive and insure that it is safe
to remove. To remove it without shutting down the computer, you must
find the SAFELY REMOVE HARDWARE icon in your system tray. That's the
little box with a bunch of icons in it at the bottom right of your screen.
The icon looks like a tiny green arrow over a grey box that may or may not
be meant to represent a hard drive. When you click that icon, you will
be given some options. Depending on the version of the operating
system, these options can vary.
The
last thing that you need to know is that you should never remove the USB
Flash Drive from the computer while data is being copied to it or from it.
In fact, you cannot just pull it out of the computer even if it isn't moving
files. You must follow one of two procedures to avoid corrupting your
data. The first and easiest method is to simply shut the computer
down. That will release the USB Flash Drive and insure that it is safe
to remove. To remove it without shutting down the computer, you must
find the SAFELY REMOVE HARDWARE icon in your system tray. That's the
little box with a bunch of icons in it at the bottom right of your screen.
The icon looks like a tiny green arrow over a grey box that may or may not
be meant to represent a hard drive. When you click that icon, you will
be given some options. Depending on the version of the operating
system, these options can vary.
![]() Sometimes
you will see a simple choice of drive letters. Mine says
Safely remove USB Mass Storage Device - Drive (E:),
which is the one I want to remove, so I click that. Several things may
happen when you do this. You may get a warning that the device cannot
be stopped at this time, which means that files are still moving between the
device and the computer. You should wait for it to finish before
removing it. You may get a little popup that says, "Safe to Remove..."
with the device name. At that point you can pull the USB Flash Drive
straight out of the computer.
Sometimes
you will see a simple choice of drive letters. Mine says
Safely remove USB Mass Storage Device - Drive (E:),
which is the one I want to remove, so I click that. Several things may
happen when you do this. You may get a warning that the device cannot
be stopped at this time, which means that files are still moving between the
device and the computer. You should wait for it to finish before
removing it. You may get a little popup that says, "Safe to Remove..."
with the device name. At that point you can pull the USB Flash Drive
straight out of the computer.
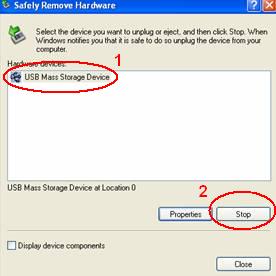 Depending
on your operating system, another window may pop up and give you confusing
choices. One of the common ones looks like the image at the left.
If you see any of these, just click the STOP button, and you'll be notified
when it is safe to remove the Flash Drive.
Depending
on your operating system, another window may pop up and give you confusing
choices. One of the common ones looks like the image at the left.
If you see any of these, just click the STOP button, and you'll be notified
when it is safe to remove the Flash Drive.
If all of that is confusing or goes hiddley-piddley in the middle, just shut the computer down and pull the Flash Drive straight out of the computer.
There are many variations on this theme, and depending on your comfort level with computers you can do several other things. This page documents the most basic procedure, and you should feel free to expand on it as you see fit.
You may decide to place a copy of your encrypted documents onto your MP3 player, for instance. That way, even in the gym or out running laps or sitting in your deer stand or duck blind, you are never separated from a copy of your vital documents.
There are other methods too - like uploading your encrypted volume file to an internet server where you can access it from any computer in the world. If you decide to do that, be sure that you are familiar with all the security protocols necessary to protect your data and yourself.
If you have followed all the directions on this page, you have turned several boxes full of photos, scrapbook stuff, children's artwork, vital documents, and other documents into digital data that you can carry around in the palm of your hand without straining your back.
Go ahead! Tie it around your neck and take a walk. Show it off to your friends and neighbors. You might start a fashion trend.
Shane