SHANE STEINKAMP'S BACKPACKING BASE CAMP
HENNESSY HAMMOCK - HOW TO VIDEO 2 - USE WITH A PAD
Hennessey Hammocks are an integrated sleep system. While their use is easy, their use is not always intuitive. This is especially true of some features, like the bottom entrance slit. This page is intended as a resource to show new and prospective users of Hennessy Hammocks some of its features.This video shows the Hennessy Hammock in use with a pad. This pad is intended to be used in colder temperatures. For a discussion of the particular pad shown, see below.
You can view the video by clicking the link below. Alternatively, you can right click on the link and select, "SAVE TARGET AS", and save the video to your local hard drive and run it from there. It will run faster, and you will not have to download it again to view it a second time. While waiting for the download (it's 352.82 KB), go ahead and read the discussion below.
DISCUSSING THE VIDEO
The video opens with me standing next to a Hennessy Explorer Deluxe A-sym. I have removed the rain fly, and disconnected the left-side hammock bed tie-out so that those things don't get in the way while I'm shooting the video. Under normal conditions, the rain fly would be in place tied out to provide shelter, or draped to one side of the hammock. So many people seem to hassle with their pads - to the point of figuring out creative ways to relieve one's self without getting out of the hammock - that I thought a full description of what I do might be useful.
 The
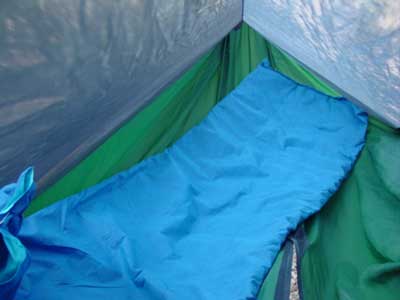
pad in question is 72 inches long, and 24 inches wide. See
below for complete details. The pad is situated inside the
hammock as shown. It is arranged offset to the ridge cord,
along the same bias as the A-sym design. If you do not have an
A-sym Hennessy, your pad configuration does not change, you just
won't have the benefit of the A-sym design to make your life easier.
As seen here, the right corner of the head end is very close to the
right tie out point, and the left foot corner is very close to the
left tie out point. If the Explorer (shown) were a little
longer (like the Safari) the pad corners would actually mate nicely
into the tie out points. The
pad in question is 72 inches long, and 24 inches wide. See
below for complete details. The pad is situated inside the
hammock as shown. It is arranged offset to the ridge cord,
along the same bias as the A-sym design. If you do not have an
A-sym Hennessy, your pad configuration does not change, you just
won't have the benefit of the A-sym design to make your life easier.
As seen here, the right corner of the head end is very close to the
right tie out point, and the left foot corner is very close to the
left tie out point. If the Explorer (shown) were a little
longer (like the Safari) the pad corners would actually mate nicely
into the tie out points. |
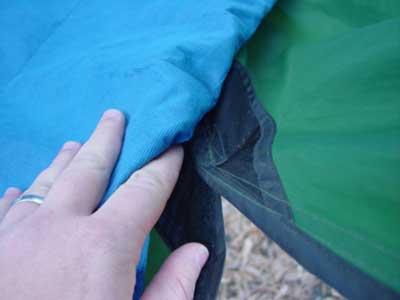 The
edge of the pad passes over the end of the entrance slit - but does not
cover the entrance slit or block it in any way. The
edge of the pad passes over the end of the entrance slit - but does not
cover the entrance slit or block it in any way. |
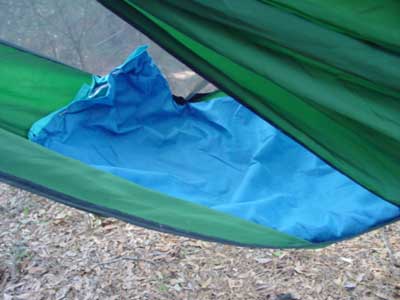 Here
is the bottom end of the pad, shown through the entrance slit.
(The entrance slit is being held open by an unseen hand.) As
you can see, the pad is a little long for the Explorer. This
causes no problems whatsoever. Here
is the bottom end of the pad, shown through the entrance slit.
(The entrance slit is being held open by an unseen hand.) As
you can see, the pad is a little long for the Explorer. This
causes no problems whatsoever. |
 This
image shows the view inside the hammock. This was taken after
dark, and the flash makes the bug netting look opaque, but it is
really very translucent. (Any light inside the hammock at night
makes the bug netting opaque.) You can see that I have hung my boots
and sandals from the ridge cord, and that the asymmetrical design
provides a wide flat space inside the hammock for the pad. I could
point my toes and not touch the edge of the hammock. I could
actually scoot quite a bit further back, but I found that I had
plenty of foot room and preferred to stow my gear at the head end
from the ridge cord. This
image shows the view inside the hammock. This was taken after
dark, and the flash makes the bug netting look opaque, but it is
really very translucent. (Any light inside the hammock at night
makes the bug netting opaque.) You can see that I have hung my boots
and sandals from the ridge cord, and that the asymmetrical design
provides a wide flat space inside the hammock for the pad. I could
point my toes and not touch the edge of the hammock. I could
actually scoot quite a bit further back, but I found that I had
plenty of foot room and preferred to stow my gear at the head end
from the ridge cord. |
As in the previous video, the hammock is hung high - up to the top of my thigh. This is contrary to Hennessy's instructions to hang the hammock at "chair height". I think that a lot of people have problems getting into and out of hammocks of all kinds because they hang their hammocks too low. Hanging the hammock high gives a few benefits. One, the hammock will sag and the ropes and straps will settle a little, so even though it starts off high, it will come down a few inches once you sit in it the first time. Second, hanging it high makes it easier to get into, and more importantly out of, the bottom entrance slit. This is especially true when a pad is in use.
When I sit down in the hammock, you can see that the hammock sags, and the ropes and tree hugger straps stretch a little. When a pad is in use, I don't change much. I sit down right in the middle of the hammock, which puts my butt mostly on the pad. From there, I lay back onto the pad, and pull my feet in, placing my feet on the pad. It is necessary to arch your back a little and scoot your butt the rest of the way onto the pad. If this seems like too much trouble, hang the hammock a few inches lower and rather than sit in the middle of the hammock when entering, sit with your butt fully on the pad. I don't like to do this, because then I have to twist on the pad, which causes problems sometimes.
Again, as in the previous video, I actually missed the 'sweet spot' a little and I'm not laying as flat as I could be. Especially note that my head is a little tilted. Some people like this because it's like a built in pillow. I like it, so I often lay like this. Some people want to lay more flat, and if I had simply aligned myself a little more with the longitudinal axis of the hammock, I would have been much flatter. In that event, the pad will traverse a small portion of the entrance slit, which doesn't actually pose a problem. In any case, my body is in an orthopedically correct position, and I could literally lay like that for hours.
I then turn, and show side sleeping (all too briefly - don't blink, or you'll miss it), and then turn again to show front sleeping. When in the hammock I am either a back sleeper or a front sleeper. Front sleeping is actually better for me, and there is a trick for that revealed below.
From there, I show the standard exit by putting my feet through the entrance slit and standing up. You'll note that because the hammock is hung high enough, I don't have to 'climb' out of it. It is very easy to step out of the hammock when it is hung properly. The pad gets out of place when I exit, but it's not hard to re-align it. If I had taken a few extra seconds to be careful, I could have kept the pad in place.
The 'problem' with using a pad in the Explorer Deluxe A-sym is that a full length pad sometimes traverses a portion of the entrance slit, a small portion of which can actually be seen in the above photo just below the heel of my boot. This makes it tricky to enter the hammock and situate yourself properly on the pad without some advanced planning. If you do it right, the pad winds up in the right place, and you wind up perfectly on the pad without too much fuss. The whole point is to practice, so practice! Once on the pad, I find that using my sleeping bag as a quilt by tucking my feet into the foot box then tucking the edges of the bag between my body and the pad was a simple process. The entire process of entering the hammock, situating myself on the pad, and arranging my sleeping bag takes less than 30 seconds. Exiting is just as easy - scoot off the pad, put your feet through the entrance slit, and exit the hammock normally.
While I don't show it, the use of a sleeping bag as a quilt is easy. Simply stuff the sleeping bag toward the head end when entering the hammock. Once situated on the pad, pull it over you and tuck it in. When front sleeping in very cold weather, I like to sleep on my front, turn my head to the side, and put my face right on the edge of the pad. I then pull my sleeping bag/quilt up over my head and make a pocket around my face. This pocket is off the edge of the pad, exposed to the fabric of the hammock bed. Since the hammock bed material is breathable, you won't suffocate. (If your hammock bed is not breathable, DO NOT do this.)
SHANE'S "ULTIMATE" PAD
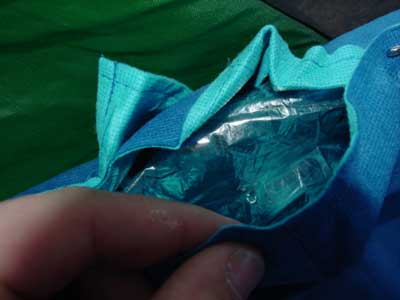 I
start with a closed cell foam pad. Any pad will do, but the lighter
the better. The higher the insulative value (r-value) the better as
well. You'll have to find a happy medium. I use a simple and
cheap pad I got from Wal-Mart. Target has similar pads. The pad
of choice seems to be Evazote, but I don't have one. I round the
corners on my closed-cell pad using a large bowl, a black marker, and a pair
of scissors. You don't need the corners... I then take a space blanket (in
this case a Coleman brand) and wrap the foam pad with it and secure it with
tape. I then wrap that assembly in a Neat
Sheet and secure that with safety pins. I could be stitched or
glued if you so chose. Tape doesn't stick to it very well. The
Neat Sheet is a cottony-soft semi-vapor barrier and is water proof. It's
also washable. After you cut the steel corner weights out, it only weighs
seven ounces. It has lots of other uses too - ground cloth, emergency
shelter, blanket... I use one as a blanket instead of a sleeping bag/quilt
when the temperature is above 60.
I
start with a closed cell foam pad. Any pad will do, but the lighter
the better. The higher the insulative value (r-value) the better as
well. You'll have to find a happy medium. I use a simple and
cheap pad I got from Wal-Mart. Target has similar pads. The pad
of choice seems to be Evazote, but I don't have one. I round the
corners on my closed-cell pad using a large bowl, a black marker, and a pair
of scissors. You don't need the corners... I then take a space blanket (in
this case a Coleman brand) and wrap the foam pad with it and secure it with
tape. I then wrap that assembly in a Neat
Sheet and secure that with safety pins. I could be stitched or
glued if you so chose. Tape doesn't stick to it very well. The
Neat Sheet is a cottony-soft semi-vapor barrier and is water proof. It's
also washable. After you cut the steel corner weights out, it only weighs
seven ounces. It has lots of other uses too - ground cloth, emergency
shelter, blanket... I use one as a blanket instead of a sleeping bag/quilt
when the temperature is above 60.
My pad, which is full length, is every bit as comfortable as the Thermarest air mattress I once borrowed. It's substantially warmer too. A full length (72" Long * 24" Wide) SHANE'S ULTIMATE PAD weighs 24 ounces, and is good down to 32 degrees Fahrenheit. This can actually be improved by various methods.
A layer of radiant barrier material or subsequent layers of bubble wrap can be added before wrapping with the Neat Sheet. With one layer of radiant barrier or two layers of bubble wrap, the pad weighs about two pounds and has an r-value somewhere between 10 and 11. The more layers you add, the warmer and more comfortable it gets. It gets heavier and thicker too. You can adjust it exactly to your needs. It's not ultralight by any stretch, but on a weight/warmth ratio, it beats everything else by a wide margin. If an Wvazote pad were used, like a Mt. Washington pad, you could cut the weight even more. I'm just using an el-cheapo Wal-Mart special...
You can also just wrap your closed-cell pad in the Neat Sheet which provides extra warmth and a comfortable surface to lay on - especially if you sleep nude - and skip the space blanket. The space blanket is crinkly and makes a lot of noise.
For use in a hammock, if you don't pull the Neat Sheet tightly around the pads, there will be about four inches of 'extra' Neat Sheet on each side of the pad. (I use a 24" pad.) These extra 'wings' provide a little wrap-around if you slide to one side of the pad or the other.
Further information about staying warm in a hammock will follow shortly. That is a VERY deep subject that deserves its own set of pages...
HOW TO HH
HOW TO HH HOME
OVERVIEW
VIDEO OVERVIEW 1
VIDEO OVERVIEW 2
THE KNOT
SNAKESKINS