GLOCK TRIGGER JOB
This page is intended to document the best practices that I have found for improving the Glock trigger. It is NOT an encouragement for you to modify your handgun. If you do so, you assume full responsibility for that action, and you will void your warranty. This page is provided for information purposes only.
WHY?
There's that "why" question again. The answer is pretty simple. The Glock trigger can be improved. Yes, Virginia, you can improve on Glock 'perfection'.
While the Glock trigger is better than some other factory triggers <COUGH>H&K<COUGH>, there is plenty of room for improvement. There are lots of other sites on the internet for this, and I especially like THIS OTHER PAGE.
This page is to document my own work and practices. Everyone should examine their own needs, and make their own decisions in regards to their personal firearms. You can pay a gunsmith a lot of money to do this kind of thing, or you can educate yourself and do it yourself. I am not a gunsmith, but I have a lot of experience working with metal, plastic, and machine parts. Really, though, it's not that hard. Guns aren't very complex machines.
The first thing to do is address the work, make sure that the gun is unloaded. Then I dry fire the weapon 1,000 times. I do this so that I can see the wear points of all the metal parts and know exactly where and what to polish. After 1,000 pulls of the trigger, and I disassemble the weapon entirely. There are plenty of web sites that explain this process.
"Don't be afraid of it. It's just a machine. It does go back together."
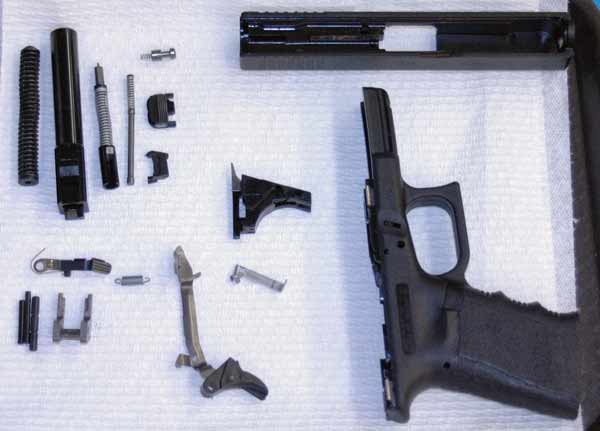
Below, from left to right is the recoil spring, barrel, striker assembly, extractor spring and plunger assembly, firing pin safety with spring, back plate, extractor, slide, and frame. In the middle is the action block with extractor. Below that is the connector, going left is the trigger bar and trigger assembly, trigger spring, slide lock lever, locking block, and frame pins.
I'm to the point now where I can take it all apart, and put it all back together in the dark. It takes me a little while, but I can do it...
I tried to document this process with photographs, but I'm having fits getting this new camera to take proper macro images. I beg forgiveness for this problem.
When I talk about polishing, I detail what I do with the Dremel tool below. An important first step, however is to use either fine sharpening stones or 2000 grit sandpaper to take all the rough spots off the parts I talk about below. All edges should be very sharp, and care should be taken not to round any of the edges. This is especially important of the sear and firing spring catch. My preferred method is to use a piece of 2000 grit sandpaper laid on top of a piece of glass or a piece of flat metal to do this work. The geometry of the parts should be maintained perfectly unless you know what you are doing and want to modify the geometry on purpose.
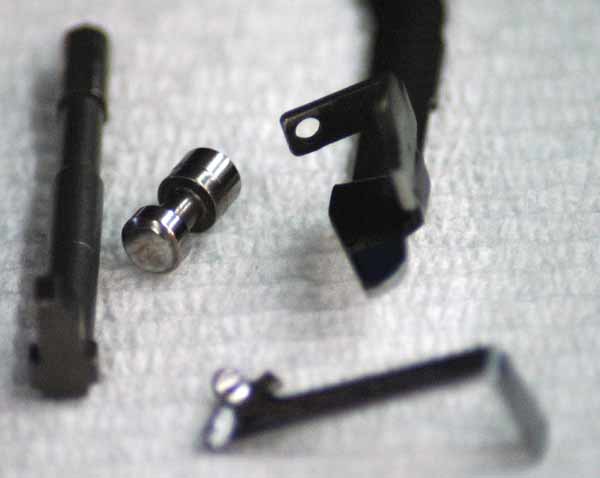
The first thing I do is polish the firing pin safety. That's the little barrel looking thing in the picture below. I use a Dremel tool with a buffing wheel and I like to use Fabulustre polishing compound for steel. Despite much advice to the contrary, the Dremel tool should NOT be used at it's fastest setting. I actually use the slowest setting, and I have always had excellent results this way. Also, only light pressure should be used, and care should be taken not to round any edges that should be sharp. To polish the firing pin safety, I hold it very carefully by one end, and slowly roll around the barrel with the buffing wheel. I then apply more Fabulustre and turn it around and do the other end. It's very small, so I can only hold a little bit of it at a time... I apply more Fabulustre to the wheel, and polish the head of the firing pin safety. (That's the end without the hole in it.) I polish in three directions, one at a time and make it shine like a mirror. I like to check everything with a magnifying glass.
I then polish the ramp on the trigger bar that activates the firing pin safety. Again, this should be very shiny when complete. Since I have the trigger bar in my hand, I polish the end of the trigger bar that interacts with the disconnector, making sure to keep the edges sharp. I do not polish back and forth, but instead use even strokes in one direction. I likewise polish the sear, and make sure that it remains sharp and even. Rounding the sear could cause the weapon to go full auto, which on the good bad scale is all the way to 'bad'.
I now turn my attention to the connector, and polish the entire 'outside' surface. I take special care to polish the engagement bar. This is a critical part of the process, and care must be taken to keep the engagement surfaces even and sharp for the trigger to be smooth.
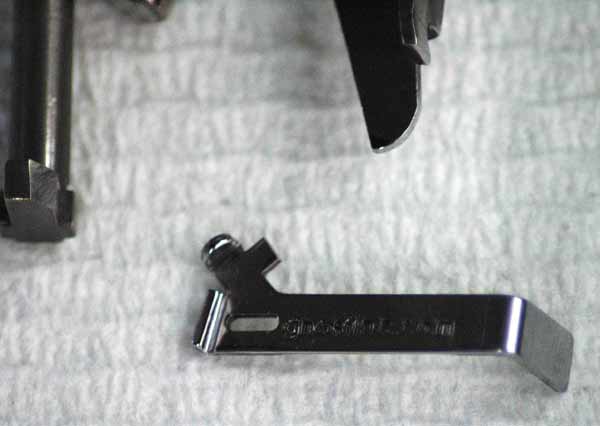
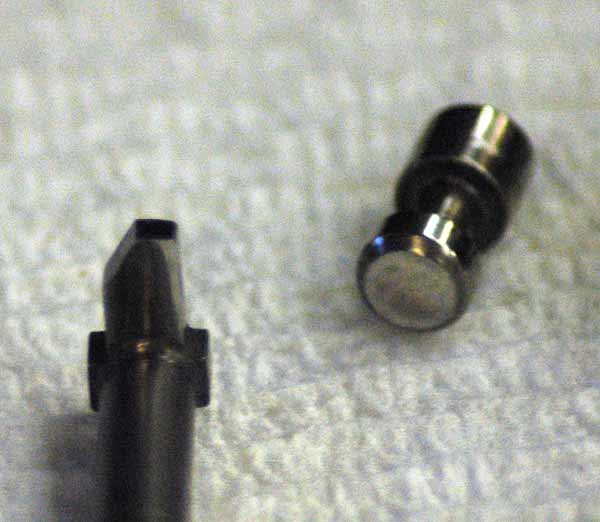
This is where my instructor is going to have a cow... (Hi Peter!) Throwing caution and the warranty to the wind, I lock the firing pin in a vise, and grind off the left side of the catch at a 45 degree angle until I cut half way through as in the image below. After careful consideration, I decided that cutting the catch in this way reduces the sear engagement, lessens trigger bar torque, and improves performance. I then polish the catch, being sure to keep all edges sharp with no rounding. Again, rounding the catch can cause the gun to run away, and we wind up on the 'bad' end of the scale with that again.
I now clean all the parts completely, and reassemble the gun, making sure to lightly oil those parts that need oil with Break Free CLP. These parts are the same parts I just polished. I also install Wolff extra strength trigger springs just on a lark. I do not install the reduced power firing pin spring. I might do that at some point in the future when I'm at the range so I can compare primer strikes.
After assembling both guns, I find that the left trigger is much improved, breaks cleanly, and is very smooth. It's just right. How heavy is the pull? I have no idea. I'm not very interested in the number, just in if it feels right to me or not. If I had to guess, I'd say that it's between 3.5 and 4 pounds. It feels good. Unfortunately, the right gun has a lot of stacking and creep, and I swap slides to see if I can isolate the problem. I find that the problem is in the right slide, and I disassemble it again. I discover that while the striker catch is nicely polished, there are still some machine marks left from the manufacturing process and these are causing the sear to creep along it in stages. I put a cutting wheel on the Dremel tool, and using it like a grinder very slowly regrind the striker catch and repolish it. When I reassemble the right gun, it feels perfect. I perform a function check on both guns, and now it's time to take them to the range and feed them various ammo and see what happens.
During the process I also installed factory extended slide releases. (Recommended!) I have the DMP Recoil Reduction Rod, which I will install at the range.
Thank you for your time.
Shane
*** UPDATE ***
Range Report - January 4, 2006
I took the Twocks (Twin Glocks) to the range tonight. Unfortunately, there isn't a 25 yard pistol range open anywhere in the area because of Katrina, so I had to go to a less than optimal 3 lane, 7 yard range. It's not a very nice place, and I don't like it, but I needed to run the function checks on both guns.
I ran out a target, and without actually trying to hit it, ran a magazine worth of CCI Blazer FMJ ammo through both guns. No problems.
I then swapped out the stock recoil spring and rod on the left gun with the DMP Recoil Reduction Rod. It comes with two springs, and I put the weaker of the two springs in first for no particular reason that that's the one I grabbed first. I put six rounds through the gun just for 'feel'. (I'm sure the people next to me were thinking that I couldn't hit crap because I wasn't really trying to hit the target.) I could definitely feel a difference with the DMP rod. How much of a difference was questionable. I sort of wondered if maybe it was a placebo effect. Rather than wonder too much, I swapped the spring out for the stronger one, and I sort of thought that I liked that better - but again I couldn't really tell if I was fooling myself.
As it was, though, I had an identical gun with a stock rod sitting right there, so I loaded both guns up and with one in each hand, fired them simultaneously. The DMP rod and spring make a very definite difference, especially in muzzle flip and recovery time. Recoil feels about the same force, but is much more even with the DMP rod. It feels 'nicer' all around, if that makes any sense.
Rather than waste too much ammo on feel, I swapped the recoil rod in the right gun and went to trying out the Tru-Glo TFO sights and aligning them. During installation, I simply centered them on the slide, figuring that would be a good place to start. I loaded some Winchester 147 grain JHPs and put up a new 4" crosshair target that I made on the computer this afternoon. I ran it out to 7 yards, and shot 4" groups with both guns. Using both hands, I shot 3" groups. (I think I could have done better if I hadn't been so tired and had not had the shakes from failing to eat lunch today!) As it was, I was satisfied that the sights on both guns didn't need to move, so I didn't mess with them.
I really like the Tru-Glo TFO sights. I was fairly worried about spending the money, but I would spend it again.
Since both weapons passed their function checks, I decided to go through some paces. I put 147, 115, and 124 grain JHPs through the guns. I put 200 rounds of CCI Blazer FMJ through the guns. Never a burp. I tried 'limp wristing' both guns, but I failed to effect a malfunction. (I still think 'limp wristing' is a myth.) I fired both guns together, which is fun. Makes a very distinctive sound. Sort of 'dink-donk'. The other three people in the range quit shooting and watched me. I can hit a piece of typing paper at 7 yards with the left hand, but it needs some work. I also need to buy a sports coat one size larger... I fired the guns in opposite hands, and found that even with the unilateral grip reductions, I could fire either gun in either hand without any difficulty.
I did some double taps, and when I was doing what I was supposed to be doing, I could run double taps 1.5" apart really fast at 5 yards. I wondered about something, and took out the DPM rod and spring, and put the stock rod and spring back in the right gun. The DPM rod does make a difference. Without the DPM rod, the double taps were 3" apart, and slower. I put the DPM rod back in and went right back to shooting fast 1.5" double taps. So, if the DPM rod isn't good for anything else, at least it's good for faster follow-up shots.
I reloaded and went home.
I pulled both guns apart and cleaned them. Cleaning Glocks is easier than cleaning USP Compacts.
I observed the start of slide piening, which is normal on Glocks. Everything was normal with the frame. I took the slide down, and was really surprised that when I had installed the DPM rod, it was smooth, but now it was considerably rougher. The spring must really chew on the rod when the weapon cycles. I'm not sure if that's bad or not, but time will tell. I cleaned it and oiled it lightly. All other aspects of the slide were normal except for the sights. The front sight on the right gun was loose. I had used fingernail polish on the screw, but I suppose I hadn't used enough, so I tightened it and used more. If that doesn't hold, I'll switch to rubber cement. (It's all an experiment...) If found that the front sight on the left gun wasn't loose, but the screw backed out easily, so I applied some more nail polish to it and tightened it again as well. I also applied fingernail polish to both rear sight set screws, which I hadn't done the first time.
All-in-all, I am perfectly satisfied with the performance of both guns on all levels.