GLOCK GRIP REDUCTION
This page is intended to document the best practices that I have found for reducing the grips on Glock handguns. It is NOT an encouragement for you to modify your handgun. If you do so, you assume full responsibility for that action, and you will void your warranty. This page is provided for information purposes only.
WHY?
SO, why would anybody want to chop up a perfectly good firearm and void the factory warranty in the process?
Many people complain about the grip angle of Glock handguns, but it isn't the grip angle that is the problem at all. It's the 'hump' of the backstrap that is the problem because it forces the gun to point high - not just for me, but for many others as well.
To properly answer 'why' I would do this on my own, I have to tell you a story. If you aren't interested in my little story or the hokey mumbo-jumbo, then skip down to where the pictures start.
Paul (my Best Friend in the Whole World) and I apprenticed
ourselves at some point to Bill. Bill was a true master blacksmith (and
became one when there actually was such a thing). As a bonus, he also ran a
large foundry and did large bronze pourings. Paul and I learned a lot about
working with molten metals in the middle, but we were more interested in the
blacksmithing. Bill had an AWESOME setup. It was by far THE most impressive
shop I have ever seen either in real life or in pictures. The vast majority
of the tools - and even some of the anvils - were made by Bill himself.
We were allowed to use certain tools, but other tools were Bill's alone, and
nobody was allowed even to handle them. Paul and I were highly respective of
this, even to the point of waiting for Bill to return if his tools were in
our way rather than even move them on the workbench.
One day Bill came in and told us that he had decided to do some special work
and that we were ready to help with that. Before we could start, though, we
had to reconfigure the shop. We took one of the larger anvils and blocked it
to height and did the same thing with one of the tables. We got out the
dishing anvils too. Anvils should be at
a certain height based on the size of the smith, and the size and shape of
the hammers. Bill got out a set of hammers and balls, and some special
peens. He took out one hammer and held it awhile, and then put it back in
the box.
I asked him what was wrong with it, and Paul said, "The head is too long."
Bill said that was right, and that he really liked that hammer, but it
didn't match the others, so he would have to reblock the tables and the
anvils every time he changed hammers. Otherwise his arm would tire very
quickly because the hammer would rebound wrong. Then he went to lunch.
Now you have to appreciate that Bill - at the ripe old age of 75 - was a
large and powerful man. I have no doubt that he could have easily crushed my
skull with his bare hands. Seriously.
I told Paul that we should build a jack for the anvils, and using some scrap
iron and old car springs, we built a shim jack (think opposing/sliding
wedges) that was operated by a foot pedal and counter balanced. Bill thought
it was a strange idea that would never work, and it took Paul and I about 5
hours to make it work. The table and the anvil both had their own jack, and
by operation of the foot pedal would raise or lower about 1 inch, but still
be perfectly rock solid.
Bill had to finally admit that it was a pretty good setup, and proceeded to
do the special work he had promised to show us - armor made from hammered
plate. It was rather impressive. After a few days, it was done, and then the
next day Bill came in and said, I want to show you boys something that maybe
five people in the entire world can do. Then he took a billet and got it
hot, set his table, and pulled the billet out with tongs. He worked it for
awhile and then set up the peens and went to work shaping the expanded
billet, heating it as needed. Using almost all of his hammers, he jacked the table up and down
with the foot pedal as he struck the steel, and he slowly crafted something
truly amazing - a human face. His hammers rang, and by then Paul and I could
tell that every strike was perfect. It was a dance and a music that I had
never before witnessed, and I have never really seen it duplicated. The face
was absolutely incredible, and if I hadn't seen it with my own eyes, I would
say that such a thing was impossible. I seriously doubt that there are four
other people on the planet who are actually capable of it. Neither Paul nor
I are capable of it, for sure, and we are both a lot better than almost
every blacksmith we know. (Paul is actually recognized as a master
blacksmith himself, while I never bothered to complete my masterworks.) The
face became the faceplate of the helmet, and once Bill burnished it, it was
something that you just couldn't stop looking at. It was truly art.
Beautiful and terrible all at once. I would NOT want to fight opposite that
face.
We talked about it, and Bill said that the jack let him do something that he
hadn't actually thought about before in all his years, and that was to not
only control the strike of the hammer in space, but to also control the
strike of the hammer in time. I spent an awful lot of time trying to figure
that out, and I finally matched it in my martial practice. It isn't enough
to dance in space. You have to dance in time. To dance in time, you have to
appreciate the music. That appreciation has two sides, though. One side is
to dance to the ambient music of the universe - which is deeply complex
beyond human understanding. The other side, though, is to create the music
from which the dance arises. It is only possible to do that by concentrating
not just on space, but also on time.
Secret technique, of course, is to both arise from the music (which is
inevitable), but to also be that instrument from which the (universal) music
arises. This is more than a state of harmonic resonance; it is a state of
pure music. In a state of pure music, a state of pure dance is possible -
and the two become indistinguishable. The Africans (and the Aboriginal
Australians) have known this for about 60,000 years, but it is something
entirely foreign to modern practice. Consuming yourself is something that
everyone is familiar with, but creating yourself just isn't done...
A gun is a machine that doesn't just have an operation in space. It also has
an operation in time. Like Bill, I want to think about that because
like Bill's hammers, a gun should be able to become an instrument from which
music arises. It is important, in my opinion, to not only tune the weapon to
itself, but also to the user. Not just in space, but also in time.
I have spent a lot of time listening to The Music of the Gun. A gun doesn't
just go 'bang'. In time, it goes kind of
sh-click-click-poof-boooo-bang-huhhhhh-ssssshhhhhhhhhhhhhhh-pock-shhhhhhhhh-
buh-click-click. A modern automatic, anyway...
This is where my interest arises.
Yes, it is a detail caught up in complex details, and yes, I am 230 pounds
with good upper body strength, so maybe it won't make much sense to anyone
else that I want to 'tune' a 9mm handgun to myself - but it makes me happy
anyway.
The Glock 19 is an ideal handgun for this work. The nylon frame lends
itself well to shaping, and the guns are reliable and uniform.
A
blacksmith chooses a group of billets for their uniformity. When the work is
done, though, each billet may be something radically different from the
simple hunk of iron or steel that it started from. The fact that the billet
is of known uniformity is a benefit.
The importance is the spirit, time, effort, and energy invested into the
billet by the artist, craftsman, and sorcerer to cause the final work to
arise.
In the end, this has nothing to do with the gun.
It has to do with you.
It is my intention to create something special from the mundane.
It's not just a work of art, it's a work of heart.
I spent several weeks arranging a space and collecting things I needed to do the work. I arranged a table in my garage to perform the work, and approached it seriously. I intended to perform the work as formal work, which is tedious, but is mindful and respectful of the work. I learned this in sword making, and I looked forward to it. Finally, my space was ready, and my wife agreed to let me have a day to myself to perform the work.
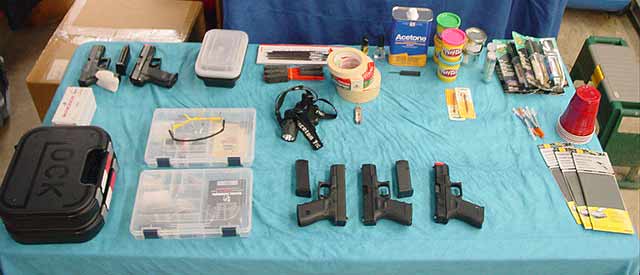
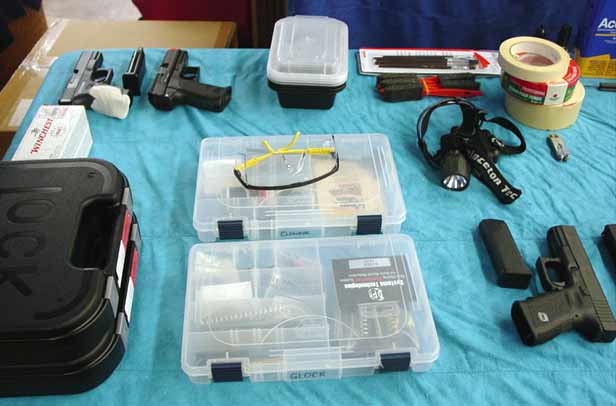
Most of these things I already had, and other things I picked up as I found them. From top left...paint brushes and sponge brushes, masking tape, Break Free CLP, Revlon clear fingernail polish, Leatherman micra, acetone, Glock tool, Play-Doh, .17 caliber brass cleaning brushes, What-a-Liner truck bed liner, putty epoxy, marine epoxy, insulin syringes (no needles, and I didn't need these after all), plastic cups, fine sandpaper (1000, 1500, 2000 grit),
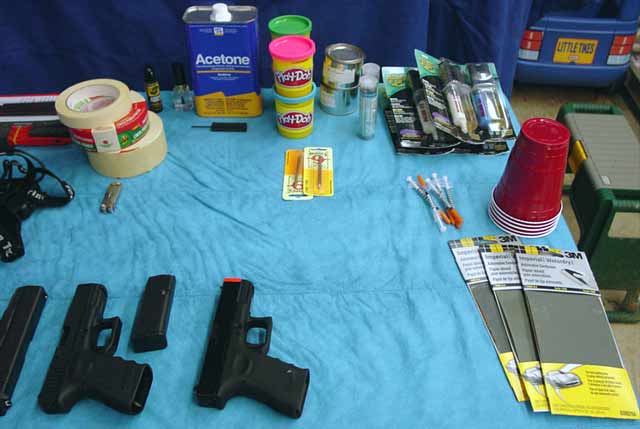
On the left side of the table...Airsoft guns for feel, plastic containers for parts, the brushes again, a headlamp, plastic storage bins (one with parts, one with cleaning supplies), eye protection, original Glock boxes, and two boxes of ammunition.
Here is a complete list of supplies and materials I am using.
| Paint brushes. Cheap art brushes of various sizes. I throw them away after using them. |
| Sponge brushes. Any bit of foam will do, really. In the end, I didn't use these, but they are good for raising a stippled texture if that is desired. |
| Masking tape. 3M Brand. I never use cheap tape. The 3M sticks well and is stronger than cheap tape. |
| Break Free CLP. Any good gun oil will do. |
| Revlon clear fingernail polish. The cheap stuff. Found at Wal-Mart |
| Leatherman micra. This is mostly for the scissors, which are very sharp and good for cutting tape. The knife is also thin, and sharp, which is good for cutting the extra epoxy away from the magazine well. |
| Acetone. Acetone is a highly flammable poison, so care must be taken in its use. It is the ultimate degreaser, and won't harm the nylon. |
| Glock tool. Any punch will do, so long as the weapon can be detail stripped. |
| Play-Doh. For filling the action block hole. Play-Doh is much better than modeling clay for this purpose. |
| .17 caliber brass cleaning brush. One is enough. Easy to find anywhere. |
| What-a-Liner truck bed liner. Available from http://www.chirienterprise.com/ . The stuff is 100 dollars a gallon. Ouch! I really like this product, though. The good news is that a small sample can be ordered for 10 dollars, and the sample is enough to do several guns. |
| Putty epoxy. I researched this online, and then found it at www.dickblick.com . Aquamend is the best for my purposes. I did not actually use any for this work, but if a mistake is made and too much material is removed from the frame, the Aquamend can be used to build it back up. Aquamend is made by Polymeric Systems. http://www.polymericsystems.com/Epoxy_Putty_Sticks.htm . In theory, the putty epoxy could be used to fill the backstrap, but various problems with that idea led me to use two pat marine epoxy. |
| Marine epoxy. I found tubes of two part marine epoxy at Home Depot. I had done some research on marine epoxies, and found that they are all very similar, and any one of them is suitable for our purposes. The kind I have has a 4 hour set time, which is good. |
| Plastic cups. I cut the bottom off a plastic cup and use that to mix the epoxy in. |
| Fine sandpaper. (1000, 1500, 2000 grit) Found at an auto parts store. I also have other sandpaper laying around the garage, but I didn't need it. |
| Plastic containers for parts. I saved some 'to go' boxes from a local restaurant. Egg cartons would work too. |
| A headlamp. I have a Princeton Tec Yukon that works well. A headlamp allows me to illuminate the work and have both hands free. Since the light comes from right over my eyes, no shadows trick me. |
| Cleaning kit. |
| Extra Glock internal parts. |
| Ammunition for loading magazines. |
| Paper towels. |
| A dremel tool, with coarse drum sanding wheels. |
| A plastic tray. |
| Q-tips. Any cotton swab will do. |
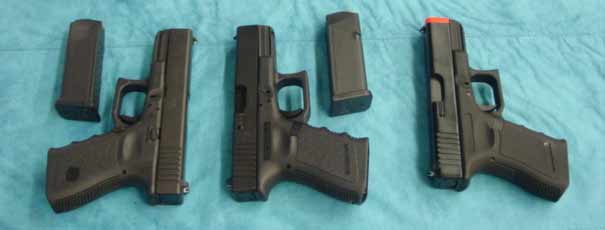
The work itself. Two Glock 19s, two magazines, and an Airsoft Glock 19 that I intend to shape at the same time for training and practice.
As this was formal work, I approached it respectfully. This is something rarely seen in the modern age. I take a complete bath and have a shave. As it is also important to dress appropriately for the work at hand, and since I am not doing anything like welding or pouring molten metal, I wear nothing. When you start flinging epoxy around, you tend to ruin whatever clothes you're wearing. It's a LOT easier just to hose yourself off occasionally when you get too dirty. I approach the work, and contemplate it.
The first thing to do is disassemble each weapon. The parts are placed in individual bins so that nothing is lost. These are covered and set aside.

I have previously performed several experiments with cheap Airsoft guns, and I learned a lot from those experiments. Those experiments are detailed here and here. In the end, I have decided against the molded grips. While comfortable, I just can't wrap my mind completely around the idea. Simply shaping the grip seems less radical, and not as fugly. Using the molded grip method, I would be unable to fire either gun in either hand if I needed to, while shaping the grip allows this, even if using the wrong gun in the wrong hand isn't very comfortable.
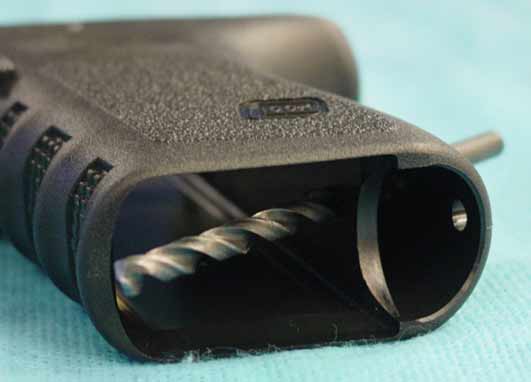
This is the point of no return. Once I go this far, there is no turning back. The first thing to do is cross drill the frame. I experimented with various methods, and found that a single hole through the frame provides extra security for the epoxy fill. Even if the epoxy fails to adhere, it will be held in place mechanically. One hole at an angle is sufficient for this purpose.
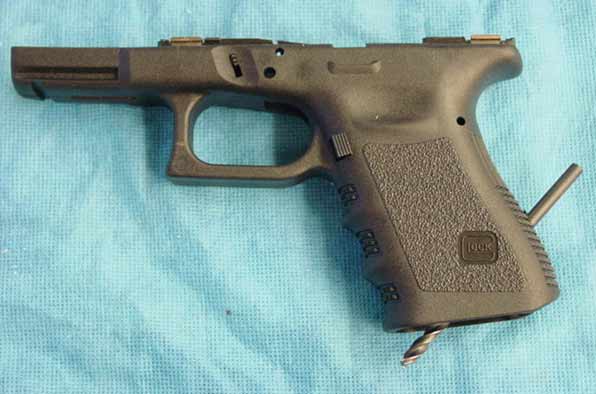
At this point the thought arose, "Holy $ihT! I just drilled holes in 1000 dollars worth of firearms!"
The frame must be prepared for the epoxy. I take a q-tip, dip it in acetone, and wash the inside of the backstrap. I then take a .17 caliber brass cleaning brush and scrub the inside surface. This scratches the nylon and provides a good surface for adhesion. In truth, I have discovered that this step is unnecessary since the epoxy adheres well to the nylon, but it never hurts to be thorough.
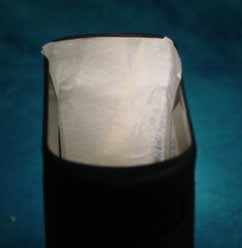
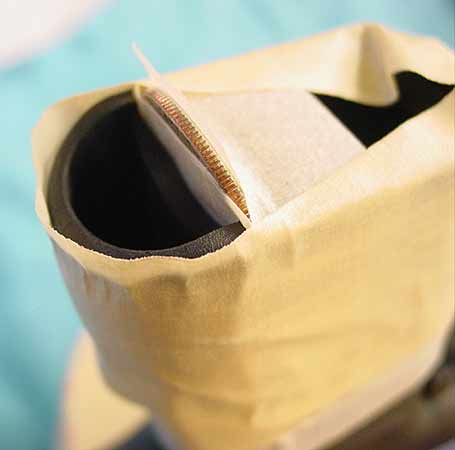
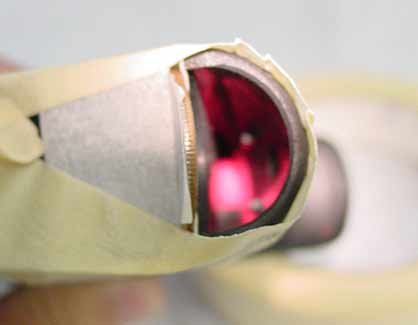
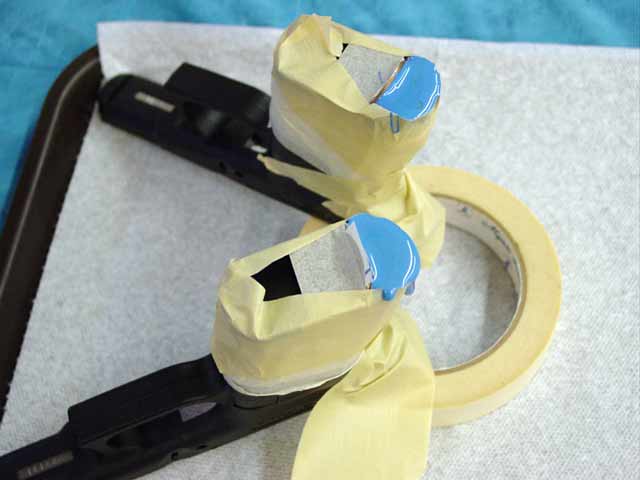
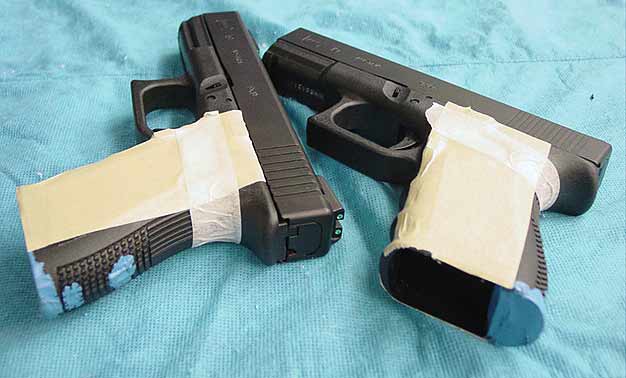
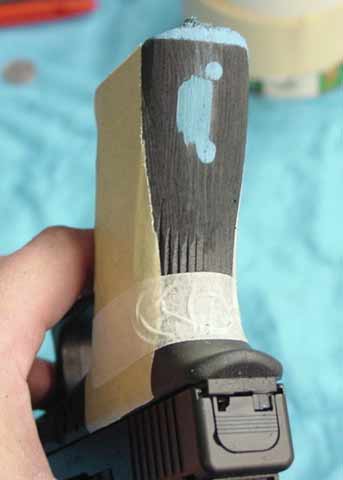
Once this is accomplished, the backstrap must be sealed so that epoxy does not flow into the magazine well. The method I use is to apply tape very carefully inside the magazine well to block the thumb hole, and to block the hole I have drilled through the frame. Masking tape works well because the epoxy will not stick to the sticky side of the tape, and so the tape will peel off leaving a nice surface. I do not use cheap tape, I spend the extra few cents and get the good stuff. 3M brand. Unfortunately, the tape isn't stiff enough on its own, so I back the tape with a quarter, taping it in place. The magazine well is not a flat surface, but angles out for a few millimeters at the bottom of the well. It is important to match this angle with the tape and the quarter.
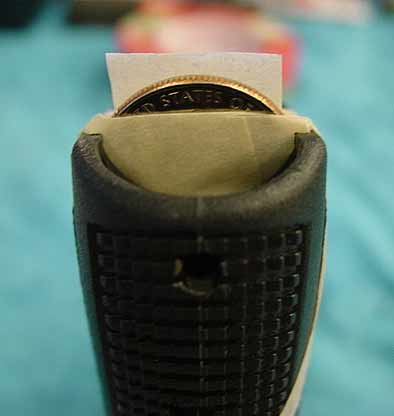
The quarter is then further bolstered by another piece of tape, and then the grip is wrapped so that the hole I drilled and the lanyard hole do not leak epoxy when it is poured.
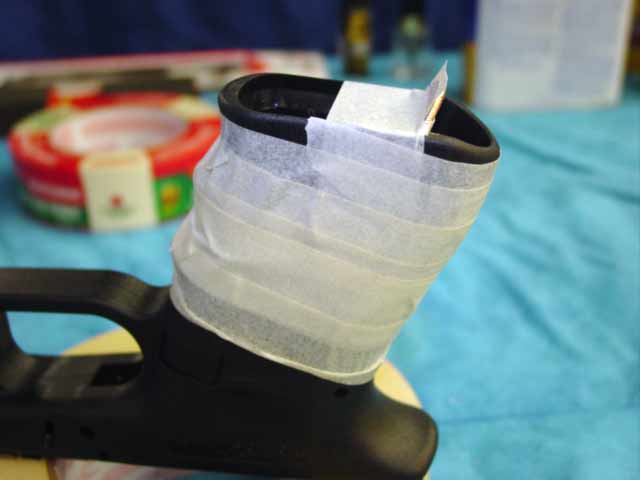
I then form a support well using masking tape that extends beyond the backstrap hole. I want the epoxy to fill up to a line level with the bottom of the magazine well.
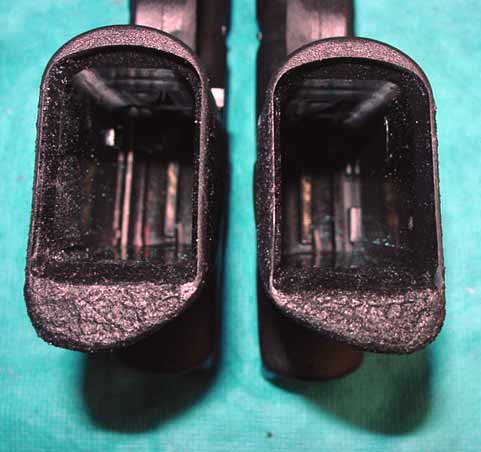
The next step is crucial. The action block fits into the frame very precisely. There is a hole between the backstrap and the space that the action block occupies at the rear of the frame. This hole must be completely plugged. If epoxy leaks into the action block space, the action block will not go back into the frame, and it will be tremendously difficult to remove the epoxy.

The best solution is Play-Doh, and I like hot pink. Play-Doh doesn't stick to anything very well, molds easily, and is water soluble. The hot pink is easy to see, and easy to tell when it has been completely removed.
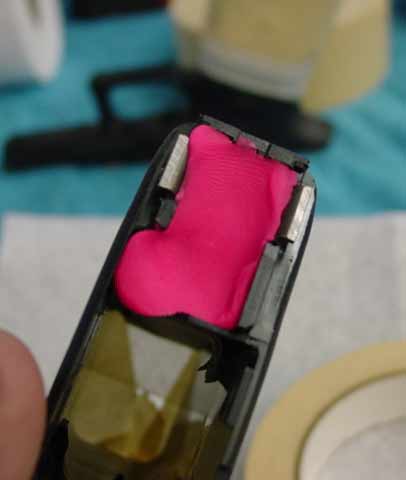
Using the headlamp, I can see when the hole is plugged by looking into the backstrap. I keep sqooshing the Play-Doh until it just starts to come out of the action block hole. Of course, at this point the thought arises, "Gads! I have just stuffed my gun full of Play-Doh!"
Not for the faint of heart...
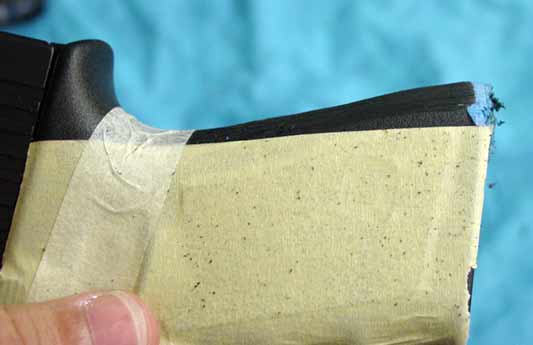
The marine epoxy must entirely fill the backstrap, with no air bubbles. If the epoxy is cold, this is difficult, so I cut the epoxy tubes apart, and put one under each arm for a few minutes to warm it nicely. I squeeze all of the contents of the tubes into the cut-off bottom of a plastic cup and then thoroughly mix the epoxy. Once the epoxy is mixed, I take a q-tip and pick up a little epoxy and fill the hole I have drilled through the magazine well from the inside of the backstrap. I now select the empty tube with the colored half of the epoxy - in this case, blue. This is the resin, while the translucent material is the hardener. I then use the empty tube like a syringe and suck the epoxy out of the cup. I then slowly inject the epoxy into the backstrap on one side only. This allows the epoxy to run down the side of the backstrap, and fill it from the bottom. This avoids any air bubbles. I completely cover the back of the frame in tape, so that any drips will not stick to the frame itself. If air bubbles come up, I pop them and allow the epoxy to fill in the void. A vacuum chamber would be handy at this point for removing any possible air bubbles, but I don't have one here. As it is, the fill on both guns is perfect, with no air bubbles.
The thought arises, "Smokes, man! Now you've done it!"
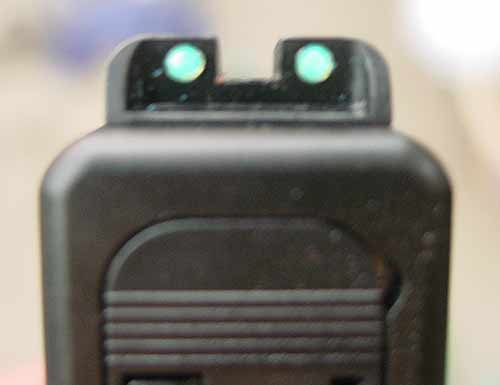
While I am waiting for the epoxy to set (about 4 hours), I install some Tru-Glo TFO sights. This proves very easy, but I take my time and align them properly.
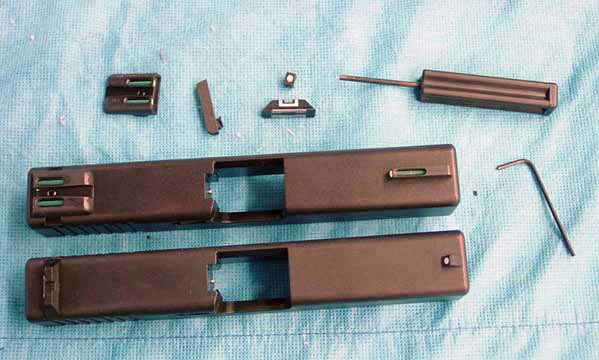
They are BRIGHT in any light. I really like them.
I check the epoxy left in the cup every 15 minutes until it is almost hardened. When it is almost hard, but I can still dent it with my fingernail a little, I remove all the tape. I then take a very sharp knife and hold it across the magazine well, and very carefully slice the epoxy level with the bottom of the magazine well. I then tape the frames for grinding. It is critical not to grind into the magazine well or into the action block space, and so I apply the tape so that I know how far I can grind.

I cut the tape so that the slide will still function, and I can insert a full magazine. When grinding, it is important to 'try' the gun often both empty and full. At no time will I actually chamber a round.
Now I wait for the epoxy to completely harden.
While I am waiting, I polish the internal parts, and replace the connector with a 3.5 pound Ghost connector. I ignore the factory directions of taking off 1 thousandth of an inch at a time from the over travel stop, and instead simply cut it to where it needs to be. This proves much easier than the directions, but also requires a good appreciation of the function of the parts. To be honest, I took off a few thousandths more than I needed to from the left gun's over travel stop. The right gun proved perfect. Instructions on how to polish the parts can be found on various other websites. I like this one. I also made my own page on the subject - click here for my Glock trigger job page.
I enjoy doing this work by hand, and I clean up the parts nicely. I still intend to come back after the grips are finished and make some other internal modifications, but I don't want to change too many things at one time. Polishing with fine sandpaper is safe.
Now that the epoxy is hardened, I attach a coarse sanding drum to the Dremel tool and address the work. "What are you doing man!? You are about to do something radical and permanent!"
No retreat, no surrender...
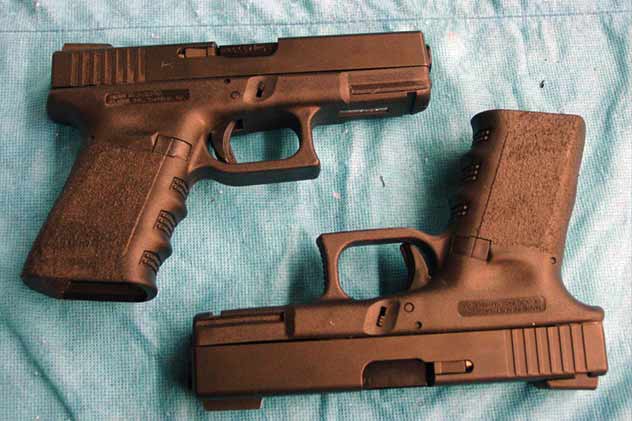
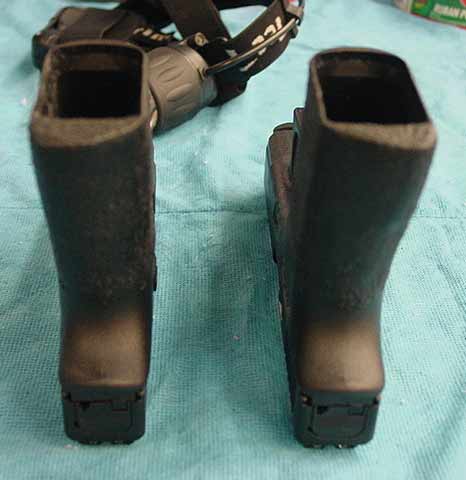
I begin grinding. Very slowly, I take the hump off the back of the gun. This one is for the right hand, and I intend to grind one for the left and one for the right, so I take off more material on the right side for the right hand. In this image, I have started to get into the epoxy, which is much softer than the nylon. I have to be careful not to gouge it. You can see that I am using long even strokes.
Getting close to straight. I continue to grind the grip very slowly taking off a 'layer' at a time and trying the weapon. I squeeze the grip tightly, feeling for any pressure points and then removing them. I remove more material from some areas than others to remove these 'high' spots, which has the effect of shaping the grip to my hand. I keep checking the weapon for 'point', and to do that I choose some point at shoulder level, close my eyes, and the 'point' the weapon at the point. When I open my eyes, I can see how the angle of the backstrap needs to change. Without the modification, Glocks point about 15 degrees high for me. I continue to remove material until I finally try the weapon, and it feels as though the gun is glued to my hand and the gun points true. I immediately know when it's right. I then begin the process again for the remaining gun, shaping it for the left hand. Because each hand is different, each gun is different.
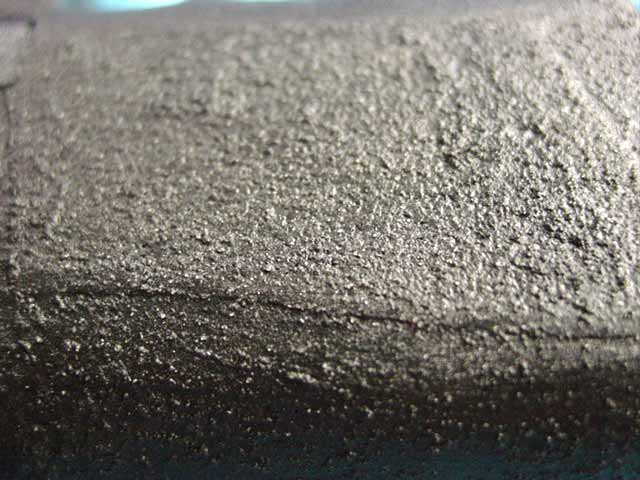
Once the grinding is complete, I wash the grips with acetone to remove any dust and oil. I use q-tips for this purpose. I allow the acetone to evaporate completely while I shake the What-A-Liner. I use black non-skid. This is the product used to line pickup truck beds, and it it very tough. It looks like thick black paint with sand in it. Various textures are possible, and the first texture I apply with a sponge is too thick and lumpy. I suspect that this is because the liner material is cold. I take it inside and warm it up and shake it well again. I sand it back off the grips and use a paintbrush instead of the sponge. When done, the texture is quite fine and feels good. I try them both together when the liner dries. Both weapons point true together.
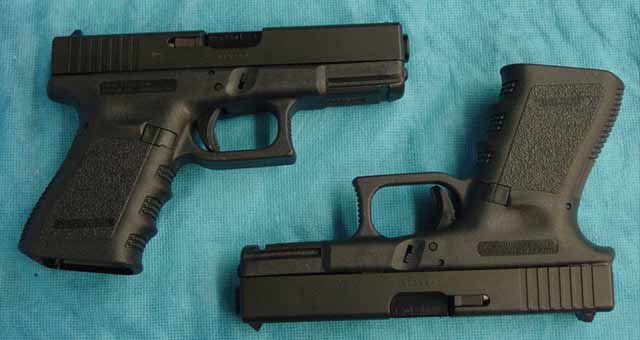
BEFORE
AFTER
(Not sure why the color is off in the photo. Both guns are still black.)
The texture isn't too ugly.
OK, so it's ugly.
Guns aren't really
for admiring are they? Aren't they a tool for throwing bullets?
Who cares what the hammer
looks like so long as the strike is true?

Out of focus...
I need to remove all that dust from the inside of the magazine well...
The final texture is very fine and comfortable. It is only a little more aggressive than the factory texture.
At this point, I completely disassemble both guns, wash them with Simple Green, oil them, reassemble them, and perform a function check.
Both weapons check, and feel much better to me than the originals.
They are uniquely mine.
<BOW>
Now, on to refining the internal parts...
Thank you for your time.
Shane